
If your company utilizes Google Workspace, chances are your data and photographs are scattered all over the place: your pc, phone, the digital camera you rarely use, and the many SD cards most likely accumulating dust. And, since keeping your company or even important personal data on SD cards, HDDs, and phones is very unsafe because the data might be lost due to degradation or theft, you should sync your data to a reliable storage service.
Google recently announced the Google Backup and Sync tool, which enables you to conveniently backup and sync your local files with Google Drive. However, if you don't know how to use Google Drive Backup and Sync tool, you're at the right sport. In this article, you'll find everything you should know about this Drive Backup and Sync app. Let's get started!
What Is Google Drive Backup and Sync?
Google's new Backup and Sync software replaces the company's Photos and Drive desktop apps for Windows PCs and Macs. You may use the software to back up the full contents of your computer or just certain folders.
When you download Google Backup and Sync, a new directory on your computer, Google Drive, emerges where you may backup your data. Existing folders on your PCs, such as Documents or Desktop, may also be synced. The software also allows you to sync data from USB devices, SD cards, and your Google Photographs photos and videos.
Users who wish to sync their data should utilize Google Drive Backup and Sync. All files are immediately transferred to the computer when you back up your chosen folders. Each machine that the user adds with this software receives its own entry. The most crucial aspect is that the file structure is preserved.
On the other hand, Backup and Sync have supplanted the Drive File Stream since it keeps all your data on your local computer. However, Google Drive File Stream keeps your files in the cloud rather than on your computer, which means you can't access the data if you don't have internet, and accessing data via Drive File Stream takes a long time.
How to Get Started With Google Drive Backup and Sync?
When you have the Google Drive Backup & Sync software installed on your computer, all of the files stored in your online Google Drive will immediately download and sync with the folder saved on your computer under the same name. Any modifications to the files or folders are updated directly to Google Drive even if you don't have internet. Take the following steps to sync your data using the Google Backup and Sync app:
Step 1: Download Google Drive Backup and Sync
On your computer, download the Google Drive Backup and Sync app. To get the Google Backup and Sync application installed on your computer, run the installer that Google provides. Launch the app after the installation process is finished.
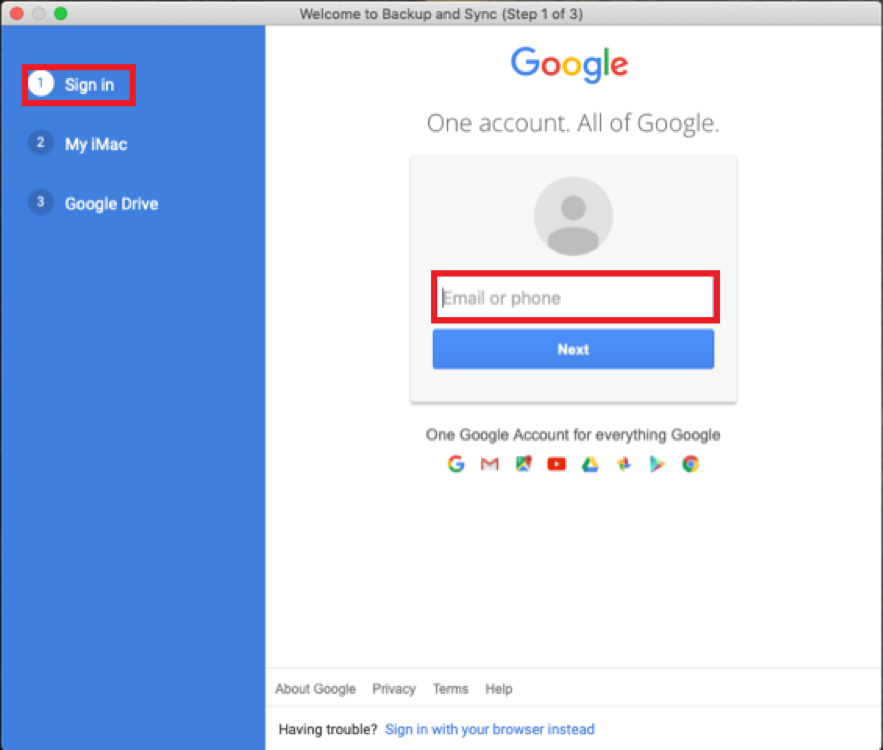
Step 2: Log In to Your Google Account
Enter the password for your Gmail account, and then click the Sign in button to sign in to the Google account you wish to utilize for storing your photos and files.
Step 3: Choose the Folder You Wish to Backup/Sync
In the My Computer window, choose the local folders that you wish to save as copies on the cloud storage provided by Google Drive. The folders chosen in this area will be stored on Google Drive's interface in a specifically designated section for them, named My Computer.
To choose the folders and files, follow these steps:
Step 1: First, choose the folders you wish to back up. At this point, you can keep the folders chosen for you by default, or you may pick additional folders for the backup by using the Choose Folder button.
Step 2: Choose the quality of your uploaded photographs, or keep the default option selected (Original quality).
Note: Remember that Google Drive only offers 15 GB of free storage space; hence, if you want to back up more than 15 GB of photos and videos, it is best to pick High Quality. Otherwise, you will have to buy a storage space higher than 15 GB.
Step 3: Finally, if you want to display the photographs from your Google drive in your Google Photo library, you need to ensure that the box labeled Upload photos and video to Google Photos is checked.
Step 4: Choose the Files from Drive
After that, you will need to choose whether or not you want to copy all of the files currently saved in Google Drive storage to a local folder on your computer.
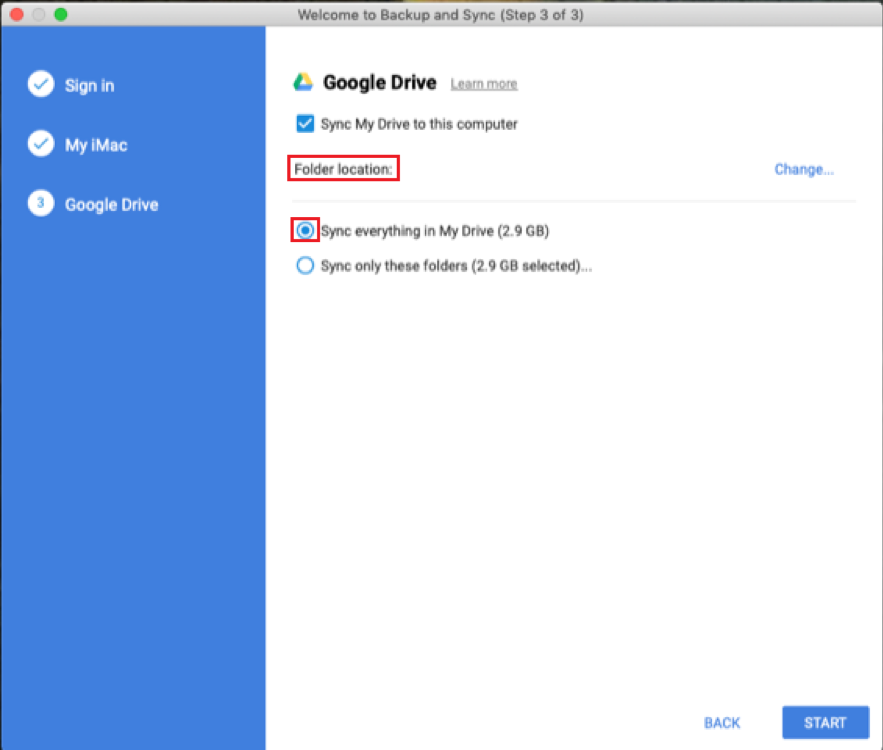
Step 5: Start the Backup
After making your choices, click the Start button to initiate the backup process.
Note: You can click on the application's icon on the taskbar to examine the backup's current state or make changes to the backup's configuration settings. To adjust the app's settings, choose Preferences from the Google Backup and Sync menu and click the Settings button.
How to Access the Synced Files in Google Backup and Sync?
You can access the files you backed up on Google Sync and Backup tool by using the following ways:
- Open the Google Drive folder by clicking the navigation bar's Google Backup & Sync button.
- Drag any files or folders to the Google Drive folder to upload them. They are removed by dragging them out. You can then access the files by clicking on them. Moreover, create and manage folders inside Google Drive, or save files straight to Google Drive from any software.
- You can also open the folders or files you backed up from your computer. You may use them even if you are not connected to the internet since they are kept on your Mac. When you save changes, they are reflected on the web and other associated Macs, Windows PCs, and devices the next time you connect.
_______________________
RELATED: Dropbox Vs. Google Drive
______________________
Is Google Drive Backup and Synch a Restore Tool?
Although Backup and Sync is an excellent tool for maintaining secure copies of your vital information in the cloud, it is not a substitute for another product for restoring files. If for any reason, your computer fails, using Backup and Sync to restore your operating system won't be an option for you. Backup and Sync users find it a straightforward and simplified alternative to Google Drive for desktop and Google Photos. You should continue using whichever restoration method you already use to back up your PC.
You no longer need to use two different applications to generate cloud backups of your data and photographs. In addition, to generate backups in the cloud, you will no longer be required to drag files to Google Drive manually. Simply guide Google in the direction of the folders on your computer that you want to monitor and back up, and it will do so automatically.
[BONUS] Tips for Syncing Your Files with Google Drive Backup and Sync
- After the sync is finished, you should check it out on the Google Drive for desktop if you can't locate a file. Launch it from the Launchpad or the start screen, or download and install the Google Backup & Sync app.
- Some directories may be empty, or files will seem to be missing until the first sync has been finished. When you sign in after the first time, the synchronization process will be finished in about a minute or two each time.
- You can check the current cloud sync or backup status by clicking the Google Backup & Sync button at the top of the screen. Go to Google Drive on your web browser.
- If the files that other people have shared with you do not appear in the folder in which you keep your Google Drive files, you may need to go into Google Drive using a web browser and add those files to your drive. Visit the online version of Google Drive by clicking the icon for Google Drive.
Final Words
Google Drive Backup and Sync is the tool that has made the syncing and backing up of your files extremely easy. It keeps the files on your computer in a shared folder while syncing them up with Google Drive. Since it's a new app in the market, most people aren't aware of it. But we hope you know what Google Backup and Sync are and how to use the tool after reading this article.
